Manual Survey Point Alignment (MSPA) can be very important for tough datasets that just won't align with automatic georeferencing.
To begin, ensure you have loaded both an exlog and the corresponding survey points file. If you have not done so already, try to run "Automatic Georeference". If you need help getting to this step, review the "Post Processing in ExynView - A Complete Guide" article.
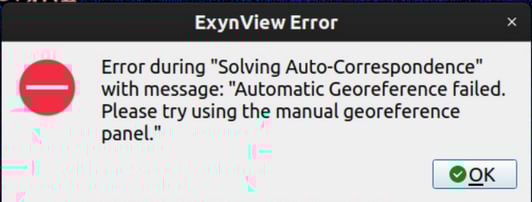
If you get the above error, first review that you opened your survey points with the correct units and order selected. If you have double checked your order and units are indeed correct and the error continues to persist, it's time to open the MSPA panel.
Opening the Manual Survey Point Alignment Panel
Begin by tapping the folder icon (1) to hide the panel, then tap the globe icon (2) to open the MSPA panel. Now you can press "Run Target Extraction" (3).
 Run Target Extraction
For best visibility I recommend clicking the folder icon (1) again, and hiding "Extracted Cloud" under "Visualization Options"—then, back in the MSPA tab, showing the "Map Wireframe" under "Visualization Options" . By default, the selectable targets that were extracted will appear as grey spheres.
 Viewing Selectable Targets on a Map Wireframe
Target Inclusion and Exclusion
There are many ways to pick and exclude targets. This section covers how to manually select targets, as well as the various ways to automatically pick and exclude.
The Manual Cluster Extraction Options
These options control what our algorithm marks as a potential target, and what is ignored.
To understand how target marking works, it’s important to first understand how the LiDAR perceives a target. In the image below, you can see two clear examples: a target appears to the LiDAR as a dense cluster of high-intensity points.
-1.png?width=670&height=411&name=image%20(4)-1.png) Survey Target Clusters—One Close and One Far
Survey Target Clusters—One Close and One Far
The DBScan algorithm (Density-Based Spatial Clustering of Applications with Noise) is used to automatically detect these dense clusters, while still filtering out high intensity noise. DBScan groups together points that are close to each other in space and have a sufficient number of nearby neighbors. Points that don’t meet these density or proximity requirements are treated as noise and ignored.
By adjusting the parameters in the "Manual Cluster Extraction Options" window, the user can get the algorithm to filter out anything that doesn’t match the expected structure of a LiDAR-seen target: a compact, high-intensity point cluster. We'll go over the options below:
 The Manual Cluster Extraction Options Menu
DBScan neighborhood radius - This controls how far the algorithm looks around each point to decide which other points are considered “neighbors.” A larger radius means points farther apart can still be grouped together; a smaller radius makes the clusters tighter.
DBScan min neighborhood count - This sets how many nearby points are required to form a target cluster. If a point doesn’t have at least this many neighbors within the search radius, it’s considered noise or an outlier.
Note: If your goal is to find those densely clustered points, you might try lowering the search radius or increasing the minimum number of neighbors, but these parameters are highly sensitive and depend on your specific dataset. There isn’t a known “right” threshold; small adjustments can change results dramatically. Stricter settings don’t necessarily mean “better” clustering—they can just as easily hide valid clusters or label too many points as noise. Playing around with the settings and utilizing the various visualization options to see if the algorithm is successfully identifying what is and isn't a potential targets is often the best method.
Intensity Range - The expected intensity values of the targets. Sometimes the minimum intensity needs to be lowered to be able to see dirty targets, or raised if there is too much high-intensity noise in the environment. Only needs to be changed in exceptional circumstances.
Point Distance-to-sensor range (meters) - Controls what range from the sensor that targets should be extracted from. Points too close may have unrealistically high intensity values (such as when using the Nexys Pro with Hesai LiDAR sensor) and can corrupt target classification. Points that are too far may have too much noise. Only needs to be changed in exceptional circumstances.
Aside from controlling target marking, there are 3 ways a user can automatically pick and exclude targets post-target extraction:
- Manually Selecting Targets
- Exclusion by Shape Similarity
- Exclusion by Radius From the Origin
 Left and Right: a Picked and Excluded Target, Respectively
What Does it Mean to Pick or Exclude?
- Picking a target means the algorithm (or user) has determined that this potential match is valid and should be used to associate one of the points within the survey point csv file with that specific target. Picked targets are treated as confirmed matches and are always included in the final alignment. Picking a target will also teach the algorithm what the target size is.
- Excluding a target, on the other hand, means that the algorithm or user has identified that potential target as invalid or unsuitable. Excluded targets are always ignored and never included in the final alignment.
Manually Selecting Targets
To manually pick or exclude a target, ensure "Selectable Targets" are set to visible in the MSPA menu. Then right-click a target sphere to open the pick and exclude menu:
 Viewing the Pick and Exclude Menu
You'll notice that 3rd options is present: assign. Assigning a target is a more specific and constrained action than picking. When a target is assigned, it is explicitly linked to a particular named point from the survey points CSV file. This enforces the algorithm to use the specified survey point at this target. Use this option only when you’re certain which target should be matched to a specific survey point.
Exclusion by Shape Similarity
 Excluding by Shape Similarity
Excluding by shape similarity is a useful tool for eliminating any marked targets that do not match the expected shape of our targets—flat circles. The defaults are perfect if you are using the targets Exyn provided, otherwise, ensure the target radius matches the radius of your own targets. "Shape Similarity Limit" should not be changed, it is an advanced parameter and it's default value of 1 is appropriate for almost all cases
Exclusion by Radius From the Origin
This button will exclude all targets that exceed the maximum radius from the origin distance set in the corresponding settings box. The example below shows exclusion of targets outside of the 10 meter radius:
 Exclusion by Radius From the Origin, 10 meters
It is rare to have a need for this option, although it can be useful if any far away reflections are being misidentified as targets.
Georeferencing and Manual Alignment Computation Options
To make sense of the options below, it helps to first understand the basic idea behind a georeferencing algorithm. The example below shows how georeferencing works in an ideal 2D case:
 Georeferencing Algorithm in an Ideal 2-D Scenario
Georeferencing aligns the shape of the survey points with the shape formed by the marked targets in the scan. In the example, the points align perfectly, showing an ideal case. In real-world conditions, however, small errors such as planar drift or tilt can cause the targets to appear slightly offset. To account for these variations the algorithm includes several parameters that define how much positional flexibility is allowed when matching points to targets.
 The Manual Alignment Computation Options Menu
To finally compute alignment, ensure you've correctly set the Manual Alignment Computation Options before hitting the Compute Alignment button (4). We'll review the options below:
Warning: It may be tempting to loosen these parameters if your scan is failing to reference, but setting them too loose can lead to false alignments. In that case, the algorithm may "hallucinate" a solution that is mathematically valid but is a physically incorrect alignment. Always double-check alignments and confirm they are in the correct locations
It can also be tempting to match every possible target, but that isn’t the goal of georeferencing. The goal is to establish a reliable set of a few matches that our GCP correction algorithm can build on to properly align the rest of the targets. Targets not initially captured by georeferencing can be caught later by GCP anchoring.
Expected Target Radius - Controls the target radius that the georeferencing algorithm will search for. The default value is ideal for the targets Exyn provides. If using different targets, adjust this parameter accordingly.
Max Affinity Distance - Specifies the maximum allowable distance between a detected survey point and a marked target for the algorithm to consider them a potential match. This sets the tolerance for positional error during matching. If you suspect a high amount of scan drift, or if your scan covers a long distance, it could be worth raising this value.
Maximum Transformation Tilt - Determines how much the algorithm is allowed to rotate the scan (in roll and pitch) while trying to align it with the target map. Increase if you suspect a lot of rotational drift. Note that if you have to set this to ~180 degrees it's likely you used the wrong survey order
Minimum # of Associations - Sets the minimum number of matched targets required for the algorithm to compute a valid transformation between the scan and the known coordinates. Lowering this number to 3 is possible but not recommended. Increasing this to force the program to get every target is also not recommended, only a few targets are needed.
Maximum # of Associations - Defines the maximum number of target matches the algorithm can use when calculating the transformation. It is usually unnecessary to change this number
Weighting Exponent - Development only, leave as default.
A. Fleischhacker, Ver. 25.04.3